Scenario Studio
The Scenario Studio sstudio of SMARTS is a stand alone package sstudio that supports flexible and expressive scenario specification. The sstudio domain specific language (DSL) has a simple ontology defined by sstypes to help express your scenario needs in SMARTS.
A scenario is formed by combining several inputs, such as (i) road map, (ii) traffic, (iii) social agents, (iv) ego agents, (v) bubbles, (vi) friction patches, and (vii) traffic histories. Refer to Scenario.
SMARTS interacts with road maps abstractly (via polymorphism) through the RoadMap interface in order to support multiple map formats and allow for extending to support new map formats.
SMARTS ships with a variety of pre-configured scenarios, which can be found in SMARTS/scenarios and SMARTS/smarts/scenarios directories.
A typical scenario creation workflow is as follows.
Create a new scenario folder, preferably under
SMARTS/scenariosdirectory, and create a newscenario.pyfile in the new folder.Design the map.
Add traffic, social agents, ego agents, friction patches, map spec, etc, to
Scenarioinscenario.py.Feed the created
Scenarioobject togen_scenario()inscenario.pyto generate the scenario.from smarts.sstudio import types as t from smarts.sstudio import gen_scenario gen_scenario( scenario=t.Scenario(...), output_dir=Path(__file__).parent, )
Finally, build the scenario by running
$ cd <path>/SMARTS
$ scl scenario build-all <path>/<new_scenario_folder>
Following sections below explain how to handle and edit (i) traffic, (ii) social agents, (iii) ego agents, (iv) friction patches, and (v) road maps, in scenario.py file. Bubbles are explained at Bubbles.
Traffic
A minimal scenario.py instantiating a Traffic object.
from pathlib import Path

from smarts.sstudio import sstypes as t
from smarts.sstudio import gen_scenario

traffic_actor = t.TrafficActor(
    name="car",
    speed=t.Distribution(sigma=0.2, mean=0.8),
)
traffic = t.Traffic(
    engine="SUMO",
    flows=[
        t.Flow(
            route=t.RandomRoute(),
            begin=0,
            end=10 * 60 * 60,  # Flow lasts for 10 hours.
            rate=50,
            actors={traffic_actor: 1},
        )
        for i in range(10)
    ],
)

gen_scenario(
    scenario=t.Scenario(
        traffic={"basic": traffic},
    ),
    output_dir=Path(__file__).parent,
)
Simply run the scenario.py file as a regular Python script to generate the scenario.
$ python3.8 scenarios/scenario.py
Traffic vehicles are controlled by either SUMO or SMARTS engine. Defaults to engine="SUMO". engine="SUMO" can only be used on SUMO road networks. For other map types use engine="SMARTS".
Flow is used to generate repeated vehicle runs on the same route. Vehicle route, departure rate, and behavior, can be configured here.
The example above simply uses a random route route=RandomRoute(). A more specific route may be used such as Route(begin=("gneE72", 0, "random"), end=("edge2", 1, "max")) which defines the edge id, lane id, and offset into the lane, to designate the start and end vehicle positions.
TrafficActor is used to specify a spec for traffic actors (e.g. Vehicles, Pedestrians, etc). The defaults provided are for a car.
Acceleration, deceleration, speed distribution, imperfection distribution, and other configurations, can be specified for the traffic.
When gen_scenario() is executed, a dir named “traffic” will be created under output_dir which contains background vehicle and route definitions.
Important
If you want to train a policy on one scenario, remember to set the end time of Flow larger or equal to your expected training time, since SMARTS will continue the flow after each reset call.
However, if there are multiple scenarios to train for one worker, you can relax this restriction since after the scenario change, the flow will also be reset to the beginning time.
Ego missions
Scenario Studio also allows generation of missions for ego agents to complete. When gen_scenario() is executed, missions.rou.xml file will be created in the output dir.
from smarts.sstudio import types as t
from smarts.sstudio import gen_scenario

ego_missions = [
    t.Mission(
        route=t.Route(
            begin=("edge0", 0, "random"),
            end=("edge1", 0, "max"),
        ),
    ),
]
gen_scenario(
    scenario=t.Scenario(
        ego_missions=ego_missions,
        ...
    )
)
Caution
The “correctness” of traffic and missions is partially the user’s responsibility. Specifically, ensuring that the start positions of ego vehicle mission routes and social vehicle traffic routes don’t overlap is not handled by the scenario studio sstudio. If they were to overlap, a collision will be immediately detected and the episode will end.
Friction patches
The Scenario Studio of SMARTS also allows the generation of friction patches which consists of a list of surface patches for ego agents and social agents. These surface patches uses PositionalZone as in the case of bubbles. When we run gen_scenario() passing in friction_maps, a “`friction_map.pkl”` file will be created under the output dir.
from smarts.sstudio import types as t
from smarts.sstudio import gen_scenario

friction_patches = [
    t.RoadSurfacePatch(
        zone=t.PositionalZone(pos=(153, -100), size=(2000, 6000)),
        begin_time=0,
        end_time=20,
        friction_coefficient=0.5,
    ),
]
gen_scenario(
    scenario=t.Scenario(
        friction_maps = friction_patches,
        ...
    )
)
Road map
SMARTS was initially designed to use maps in the SUMO road network format; it supports these natively.
However, SMARTS >=v0.5 supports other custom map formats, as long as a class that implements the RoadMap interface is provided to read the custom map format.
Current support of custom map formats:
OpenDriveRoadNetworksupports the use of OpenDRIVE map format.WaymoMapsupports the use of Waymo map format.
Create a custom map
If not utilizing a built-in map type (i.e., SUMO, OpenDRIVE, or Waymo map),
define a MapSpec object in your scenario.py.
# Function that can create custom map objects using a map_spec
def custom_map_builder(map_spec):
    # ...
    return map_object, map_hash

map_spec = MapSpec(source="path_or_uri", builder_fn=custom_map_builder)
Convert an existing map to SUMO
If you have a suitable file in another format, you can turn it into a SUMO road network using the sumo2mesh conversion utility.
$ python3 -m smarts.sstudio.sumo2mesh dataset_public/2lane_sharp/map.net.xml dataset_public/2lane_sharp/map.glb --format=glb
$ python3 -m smarts.sstudio.sumo2mesh dataset_public/2lane_sharp/map.net.xml dataset_public/2lane_sharp/map.egg --format=egg
Create a SUMO map
Design map using SUMO’s netedit and export it in a map.net.xml format.
First, start netedit.
$ netedit
On the top left bar, “file” -> “new network” to create a new map.
Use shortcut key “e” to change to edge mode. Click “chain” and “two-way” icons located on the far right of top tool bar, shown in the image below:

Then click on map to start creating new edges and lanes.
Note that SMARTS prefers to have “internal links” (connections) as part of any Junctions. You can enable these by going to “Processing” -> “Options”, choosing the “Junctions” section, and then making sure the “no-internal-links” checkbox is unchecked.
Edit an existing SUMO map
“file” -> “Open Network…” to open an existing map.
Click on the inspect icon to enable inspect mode

Click on any edge to inspect detail and modify properties.
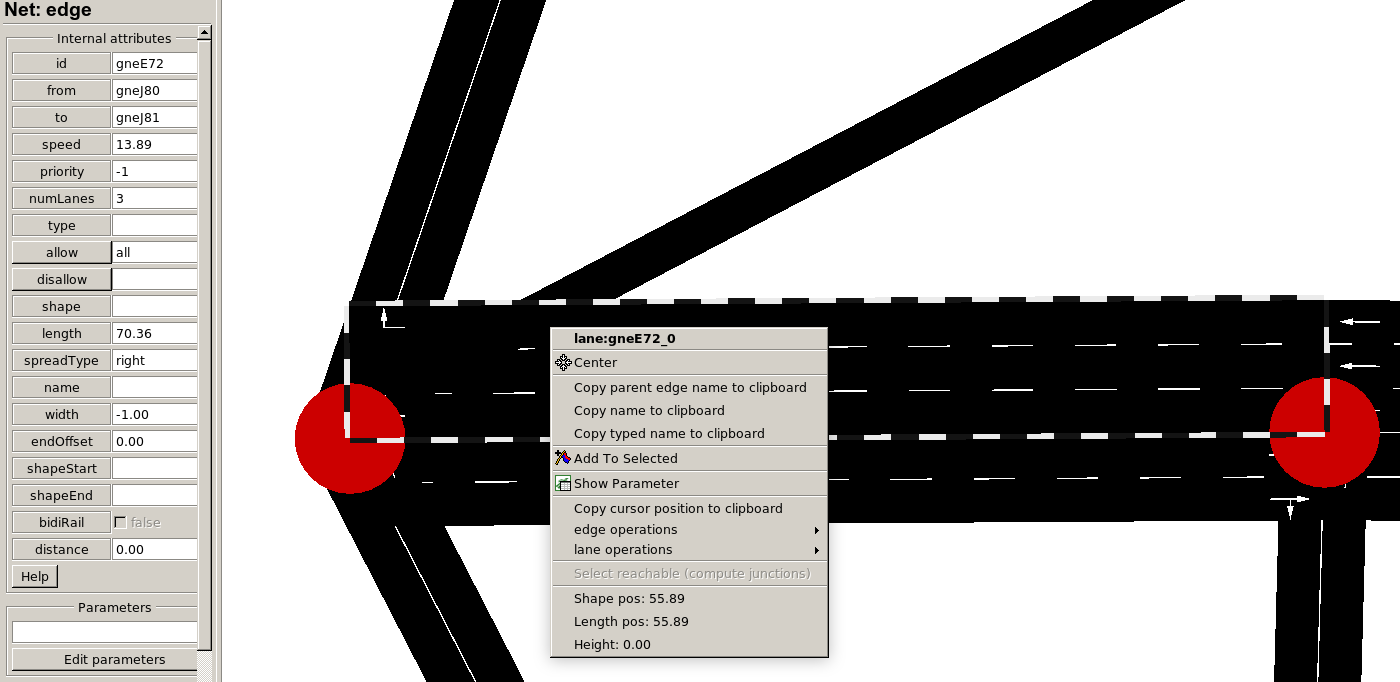
The selected block is an edge with id "gneE72". It contains 3 lanes with lane index 0, 1, 2.
To modify the properties, for example change the number of lanes to 2 lanes by changing 3 to 2 on the “numLanes” field, and press “enter” to make the change. Then press "ctrl+s" to save. Finally, make sure to rebuild the scenario.
scl scenario build --clean <path/to/scenario/folder>
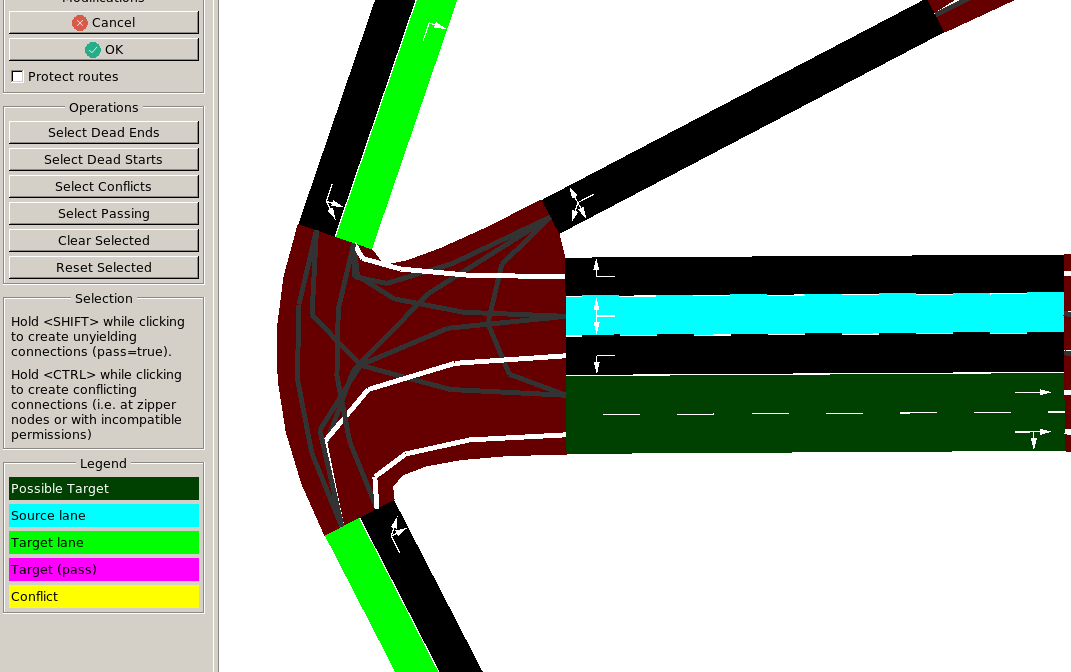
To create custom connections between edges, first click the following icon on top bar.
The first lane you select would be the source lane, highlighted in blue. Then select other lanes as target lanes to connect to.
Social agents
Social agents are controlled by (pre-trained) policies from the agent zoo (see
policies).Scenarios can reference remote packages or local zoo agent packages by including a
requirements.txtfile in the root of the scenario folder. These additional packages will be installed when the scenario is built.A minimal example defining social agent with extra dependencies is shown here. In the
requirements.txtfile:Then in the
scenario.pyfile: